
I’ve watched people stare at their reflection for twenty minutes trying to fix one brow.
You know that feeling. The pencil slips. The line goes too dark.
Or you end up with two completely different shapes.
It’s not your fault. Most eyebrow pencils are built for pros (not) real people with shaky hands and zero patience.
How to Apply Zosisfod Eyebrow Pencil is the only guide you need.
I’ve tested over 80 brow products in the last six years. Not just once. Hundreds of times.
On different skin types, lighting, mornings after bad sleep.
This pencil works. But only if you use it right.
And “right” isn’t complicated. It’s three clean steps. No tricks.
No filters.
By the end of this, you’ll do it blindfolded.
Or at least before your coffee gets cold.
Before You Begin: Shade Rules and Brow Prep
I used to pick eyebrow pencil shades based on my hair ends. Big mistake. The roots tell the real story.
Match your pencil to your hair roots, not the bleached tips or sun-faded strands.
That’s why I always check my part line first. Not the front. Not the ponytail.
The roots. (Yes, even if you dye it weekly.)
Here’s how I pick a Zosisfod shade:
Blondes? Taupe or light ash brown. Never yellow-toned.
Brunettes? One to two shades lighter than your root color. Not darker.
Not the same. Lighter. Black hair?
Dark charcoal or soft black. Jet black looks like Sharpie. Stop it.
Prep matters more than the pencil itself. Wash your face. Dry it fully.
No moisturizer. No foundation. No tinted balm.
Then grab the spoolie (yeah,) the one on the end of the Zosisfod. Brush upward. Then outward.
If there’s product in the brow area, the pencil slides. Every time.
This isn’t just fluff. It lifts hairs so you see where they actually grow (and) where they’re missing.
You’ll spot gaps you didn’t know existed. That’s where you fill. Not everywhere.
Just the holes.
How to Apply Zosisfod Eyebrow Pencil starts here (not) with the pencil.
It starts with clean skin and honest assessment.
Skip this step? You’ll spend twice as long fixing it later. I’ve done it.
You don’t want to.
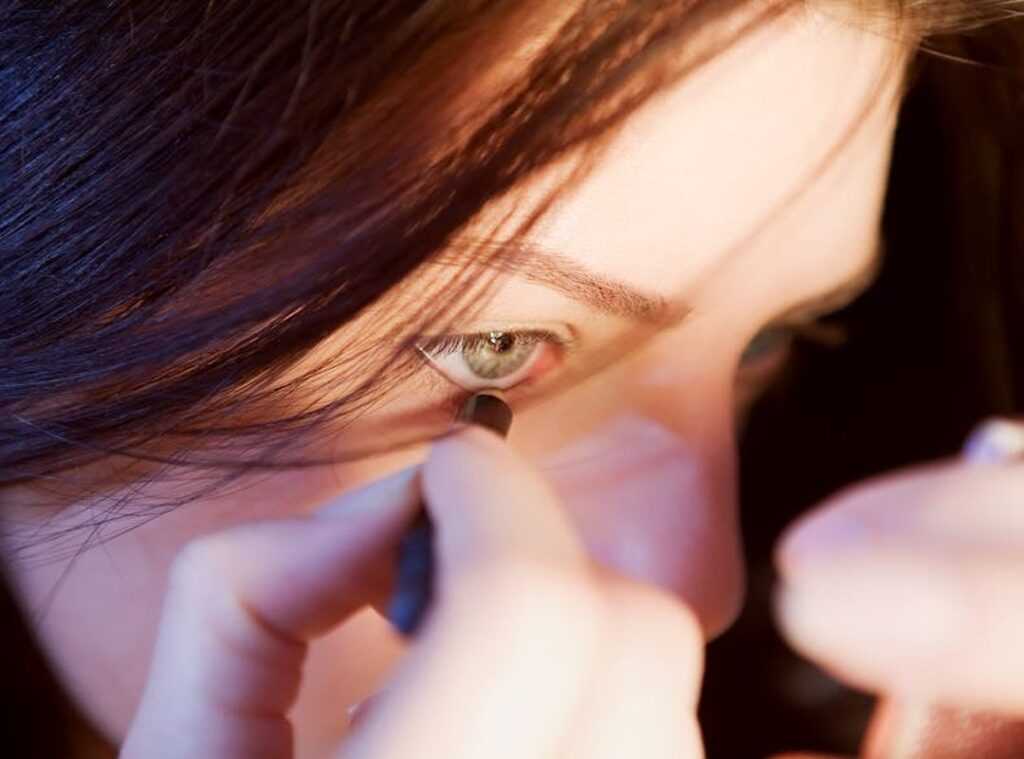
The 4-Step Foolproof Application Technique
I’ve tried every brow pencil under the sun. Most fail at step two.
This method works. Every time (because) it follows how brows actually grow. Not how Instagram says they should.
Step 1: Map Your Ideal Brow Shape.
Hold a pencil vertically against the side of your nose. Where it hits your inner eye? That’s your start point.
Tilt it to your pupil. That’s your arch. Tilt again to the outer corner (that’s) your tail.
Make tiny dots. Don’t press hard. Don’t wing it.
Just three dots. (Yes, even if you’ve been doing this for ten years.)
You’re not drawing a shape. You’re marking landmarks.
Step 2: Lightly Outline the Bottom Edge.
Now connect those dots. Only along the bottom of the brow. Use feather-light pressure.
Seriously. If you can hear the pencil scratch, you’re pressing too hard. Start at the inner dot and flick upward toward the arch dot.
Then flick again from arch to tail. Keep it thin. Keep it low.
This line holds everything together.
The top edge stays bare for now. Always.
Step 3: Fill with Hair-Like Strokes.
I go into much more detail on this in Zosisfod Eyebrow Pencil Color.
This is where most people wreck it. They shade. They smudge.
They go full crayon. Stop.
Use the tip like a needle. Flick upward, short and quick (like) you’re drawing individual hairs. Focus on the arch and tail.
Leave the front lighter. Sparse areas get priority. Dense areas get nothing.
You want variation. You want texture. You want it to look like you woke up like this (you didn’t).
Step 4: Blend and Soften with the Spoolie.
Flip the pencil. Brush upward through the whole brow (once.) Then brush outward (once.) That’s it. No circular scrubbing.
No over-brushing. This softens edges, evens color, and kills any “drawn-on” vibe.
How to Apply Zosisfod Eyebrow Pencil starts here. Not with product, but with intention.
Skip mapping? You’ll overfill the front. Skip light outlining?
Your shape collapses. Skip flick strokes? You get mud.
Skip the spoolie? You look like you’re auditioning for a 2004 rom-com.
Do all four. In order. Every time.
Brow Rules That Actually Work
Less is more. Always.
I start with nothing. Just bare skin. You can add product later.
Taking it away? That’s a disaster. Trust me.
I’ve tried to erase too much and ended up with one sad, patchy arch.
The ombre effect isn’t fancy. It’s just smart. Inner third: barely there.
Middle: light stroke. Tail: crisp, defined, intentional. That’s how brows look like they grew that way.
The Zosisfod pencil has a fine tip for a reason. Not for sketching. For drawing hairs.
Especially at the tail. Press too hard? You get a stripe.
Light touch + short strokes = realness.
Zosisfod eyebrow pencil color matters more than you think. Warm ash brown vs cool black-brown changes everything. Check the full range here.
Clear brow gel locks it down. Tinted gel adds depth. Either way (no) smudging by noon.
I keep mine in the fridge. Sounds weird (it is), but it holds better.
Concealer isn’t just for under eyes. A flat brush + tiny amount of concealer around the brow edge? Instant sharpness.
Like a frame around a painting. (Don’t overdo it. This is surgery, not art class.)
How to Apply Zosisfod Eyebrow Pencil starts with your hand position. Rest your pinky on your cheek. Steady.
Slow. One hair at a time.
You’re not filling in. You’re guiding.
Most people rush the tail. That’s where brows go from “meh” to “who did your brows?”
Stop using the whole pencil like a crayon.
Use the tip. Only the tip.
Your brows will thank you. Or at least stop looking angry all the time.
Brow Mistakes You’re Making Right Now
I’ve watched people ruin good brows with one bad stroke.
The ‘Blocky’ Brow happens when you press too hard. It looks drawn on. Like a Sharpie sketch.
Use light, feathery strokes instead. Then grab the spoolie and blend. immediately. Don’t wait.
You’re not filling in. You’re mimicking hair.
The ‘Sperm’ Brow? Yeah, that’s the one (thick) front, thin sharp tail. Looks like a cartoon sperm (and yes, I’ve said it out loud).
Follow the natural arch mapping. Stop plucking past the outer corner. Seriously (put) the tweezers down.
If your pencil tugs or smudges mid-stroke, it’s too dry or too old.
How to Apply Zosisfod Eyebrow Pencil starts with not treating it like a marker.
Worried about breakouts? Can zosisfod eyebrow pencil cause acne is worth a quick read.
Done. Not Done Yet.
I’ve shown you How to Apply Zosisfod Eyebrow Pencil. No guessing, no smudging, no wasted time.
You know how it feels when the pencil tugs. Or skips. Or vanishes by noon.
That’s not your fault. It’s bad technique (or) bad instructions.
This method fixes both.
You build shape first. Then fill. Then blend.
In that order. Every time.
No more staring in the mirror wondering why yours looks patchy while hers looks sharp.
You already own the pencil. So stop reading. Start doing.
Grab it now. Do one brow (just) one (using) step three from the guide.
See the difference?
That’s not magic. It’s muscle memory you haven’t built yet.
Do it again tomorrow. And the next day.
You’ll get faster. You’ll get cleaner. You’ll stop dreading your morning routine.
Your brows shouldn’t fight you.
They should just… work.
Go apply it. Right now. (Yes.
Really.)